
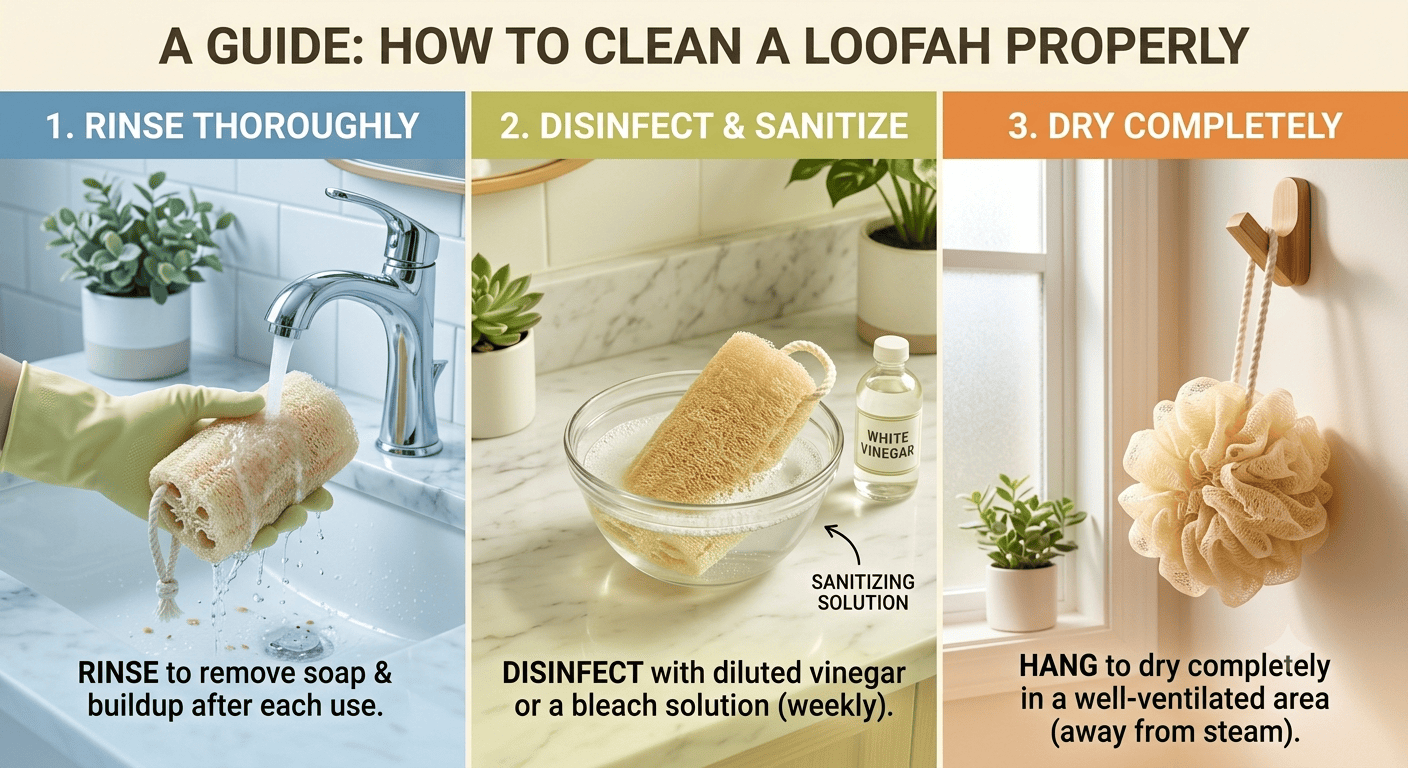
How to Clean a Loofah
That combination makes it a tool that needs routine care, not just occasional rinsing. If you want to know how to clean a loofah properly, the key is to focus on both sanitation and drying.While a loofah might be awesome at exfoliating the skin, its sponge-like texture can collect and retain moisture, soap build-up, dead skin, and any grime that you happen to pick up.So it’s a hygiene item that calls for more than just a quick rinse. To achieve the correct loofah sanitation methods, proper cleaning and drying are necessary.
Why Loofah Care Matters
A loofah can stay damp because it often hangs in the shower, where airflow is limited. Dampness could help to grow mildew, mold, or even bacteria at a much higher rate than anticipated. If your loofah’s aroma has grown a bit musty, has started to feel slimy, or takes too long to dry out, a simple splash and rinse isn’t going to cut it.
It is important to regularly clean it, since a loofah touches skin time after time and traps skin cells, hair, soap and grime that stays behind between uses.
Bacteria can also get trapped and develop in your loofah, and even though it might appear perfectly clean it’s still likely harboring dirt in its threads. For a better understanding of how bacteria can survive on damp household items, it helps to review guidance from trusted health and hygiene resources.
Know Your Loofah Type
Made of dried plant matter, natural loofahs tend to be more abrasive and absorb moisture even better-allowing the moisture to sit deeper inside the loofah for longer periods of time. The longer loofahs stay wet, the greater the chance for mold to grow. For natural loofahs, a deep clean and a proper drying process are absolutely critical. When the material begins to degrade and feel softer and softer, that is when it is time to invest in new natural loofahs.
Made of similar plastic-based fibers as the plastic mesh pouf, synthetic loofahs and meshes also benefit from a thorough scrub with a bit of hot soap and water to properly clean it. Unlike natural loofahs, the plastic material does not soak up the moisture as easily, which can cause these types of tools to dry out a bit quicker, and possibly handle the heat of sanitizing processes a bit better.
However, like the rest of the loofah and scrub tool collection, they can still easily harbor soap residue and grime when they are not rinsed and properly dried out, which can also result in bacteria growth. No matter if the scrubbing sponge you chose is a natural loofah or a mesh alternative, ensure to utilize the correct method for cleaning it, otherwise you can risk damage or injury in the long run.
How to Clean a Loofah
The easiest daily habit is just to rinse the loofah off after each shower, wring it out as dry as you can and hang it where it has a lot of airflow. This will never really sterilize it but will definitely inhibit the growth. If you leave your loofah wet in the shower, it is providing a breeding ground for dampness.
If it really needs a deep clean, the majority will try a hot wash, a diluted bleach soak or a vinegar solution – it all depends on what the loofah is made of! You’ll aim to remove any buildup and deodorise the item, without damaging it. Following this, much like the daily rinse-off, ensuring it dries fully is vital.
Daily Care Routine
Rinse the loofah of any soap suds with warm water. Then, squeeze it several times to remove all of the water. Now, place it to air dry somewhere with good ventilation – definitely not in an enclosed shower on a hook! That easy routine will save your loofah from the musty smells and slimy textures.
Weekly Deep Cleaning
Once a week seems reasonable for the deep clean – often enough that things don’t have too long to build up but not so frequent that they are going to quickly wear the material out. Depending on the type of loofah you use, you should opt for the method that works best for that particular kind, as per manufacturer instructions if provided.
Some use a soak in vinegar, which works well to break down the grime and refreshen the material after being rinsed well and dried completely. Others use a weak bleach solution and then a very, very thorough rinse, but I avoid that method as bleach can be tough on some materials and it can be difficult to fully remove from some types of loofah if it’s not quite thorough.
Microwave and Machine Methods
Synthetic loofahs might be microwavable if they’re wet all over, with no metal components, but never put dry ones in the microwave-that’s what will potentially damage or burn the loofah. Machine washing can also sometimes work for a wash on the softer end of a bath tool like a sponge or synthetic loofah, as a way to clear out a buildup of skin cells. It’s important to dry it out fully even after this method.
Never think a wash will make it safe to continue indefinitely. If a warning label has been lost, use another option with caution.
Common Mistakes to Avoid
One of the biggest blunders people make with loofahs is leaving them in the shower. This leaves the sponge in an environment that’s perpetually warm and moist. Even with a thorough cleaning, the excess moisture cannot always drain away completely.
Another way to wreck a loofah is using an inappropriate cleaning procedure for it. While a natural loofah can fray more quickly with regular aggressive handling, even an artificial loofah could be altered by exposure to extreme temperatures or incorrect chemical solutions.
One final, and arguably biggest mistake, people make with loofahs is not replacing them regularly. Even with proper maintenance, loofahs break down over time and the fibres can still hold residue no matter how clean you are with it. If the texture has become altered or the odour cannot be completely scrubbed out of a loofah, it is often easier to replace it.
When to Replace It
Even if you take care of a loofah, it won’t survive an eternity. If your loofah smells bad even after a few days of being cleaned, feels slimy and gooey, or becomes discolored, it’s likely that you have reached its life’s end. This also goes for a loofah that is fraying apart, losing shape, and no longer holds together.
As much as some might expect, natural loofahs must be replaced regularly and often.
They last shorter than their synthetic counterparts, but they too should not be used until they fall to bits. Worn loofahs cannot be properly cleaned and are not as effective at washing your body.
Best Practices for Longer Life
Rinse, wring out, and dry it out after each use. This will have more impact on the lifespan of a loofah than sporadic deep cleaning. It all boils down to air circulation, though.
Store it outside the most humid area in the shower whenever possible as part of smart home cleaning habits.
For example, use a loofah on a hook near a window, vent or fan rather than stuffed into the corner. Consider rotating between a couple of loofahs in humid environments so that each has sufficient time to fully air dry. Smell and texture are also good indicators; they are generally the first things to deteriorate when a loofah needs cleaning or replacement. Waiting until the loofah actually looks dirty will probably be a few too many steps late.
Practical Cleaning Table
| Loofah Type | Good Cleaning Options | Drying Priority | Replace Sooner If… |
| Natural loofah | Vinegar soak, brief bleach soak if appropriate | Very high | It smells, softens too much, or breaks down |
| Synthetic mesh loofah | Vinegar soak, machine wash, careful sanitizing method | High | It feels slimy or loses shape |
| Bath pouf | Gentle wash and thorough drying | High | It stays damp too long or holds odor |
Conclusion
Learning how to clean a loofah is mostly about three things: rinsing well, sanitizing on a schedule, and drying it completely. If you do those consistently, the loofah is less likely to build up odor or residue.Material of course matters, and the way that you wash will depend on the sort of loofah that you have, so this is a really handy rule.
And loofahs, even when they are very clean, are not a fixture for a lifetime. If washing fails to restore a loofah to a state that is fresh, clean and hygienically fit for use, the only sensible thing is to simply substitute it, with a fresh replacement. The washing plan that you choose that will ensure your loofah remains clean and hygienically ready to use is the ideal.
Answers to Common Questions
How often should I clean a loofah?
A weekly deep clean is a practical routine for most people, along with rinsing and drying after every use.
Can I put a loofah in the microwave?
Some synthetic loofahs can be microwaved only when they are fully wet and have no metal parts. Natural loofahs and unclear materials are better cleaned another way.
Is vinegar safe for cleaning a loofah?
Yes, vinegar is often used as a gentler cleaning option. It is helpful for freshening and loosening residue, especially when followed by thorough rinsing.
Should I use bleach on a loofah?
A diluted bleach soak can disinfect some loofahs, but it must be used carefully and rinsed very thoroughly. It is not the right choice for every material.
How do I know when to replace a loofah?
Replace it if it smells bad after cleaning, feels slimy, looks worn, or no longer dries properly.
Can a loofah grow mold?
Yes, if it stays wet for too long or is stored in a humid area with poor airflow. Drying is just as important as cleaning.